Notifications
On the Notifications page, you will find all notifications generated from exceeding notification conditions. The notification conditions determine when notifications are created and are defined separately for each performance point.
Alerts, warnings and informatives
The notifications have three different severity levels.
Severity level | Icon | Identity color |
|---|---|---|
Alert |  | Red |
Warning |  | Orange |
Informative |  | Blue |
Notification list

First select or enter the filtering criteria and then click on Search. You can also sort the list.
You can choose one or more notifications from the list. After that, you can acknowledge the notifications using the Acknowledge button at the bottom of the page. The button row at the bottom of the page also has Select all and Deselect all functions. You will also see the number of selected notifications on that row.
Acknowledging the notifications one by one
We recommend that you acknowledge the notifications one by one, if possible. This way, you can provide individual acknowledgment details for each notification and review the details of the notification in detail
Click on an individual notification from the list to view its details and acknowledge it.

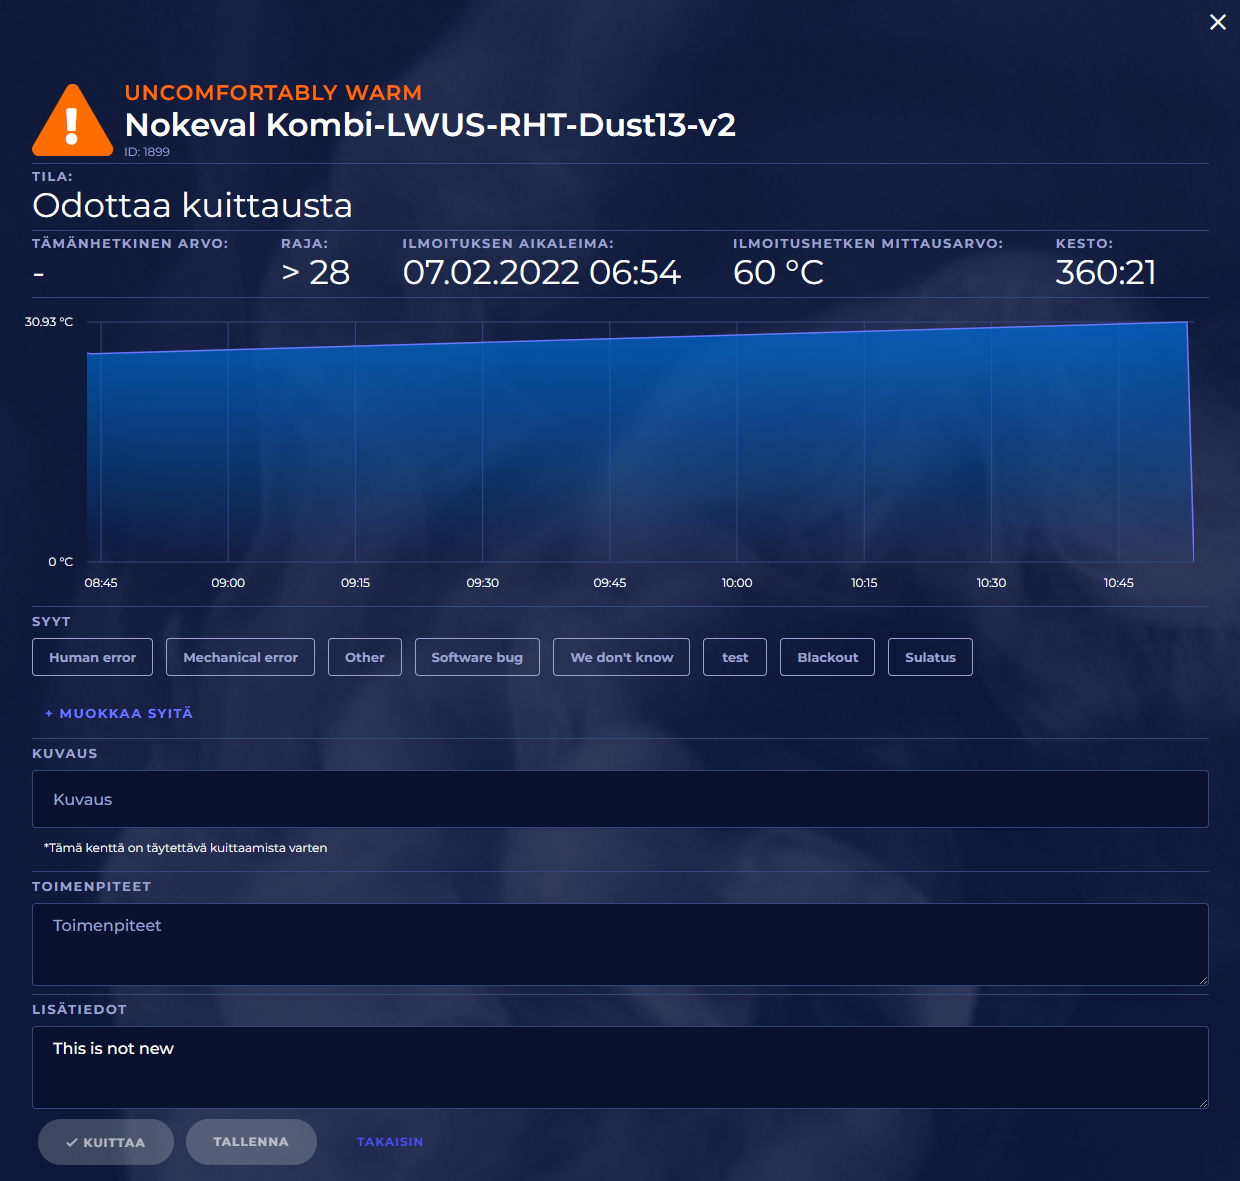
Basic information of notification
The icon represents the severity level of the notification. At the top, you can see the notification message. Below that, you can see from which site and control point the notification is coming from.
Status
Active | The situation that caused the notification is still active, for example, the measurement value of the channel is still above the defined upper limit. The notification cannot be acknowledged yet, but information can be saved to it. |
Pending | The situation that caused the notification has ended and the notification can be acknowledged. |
Acknowledged | The notification has been acknowledged. Procedures and additional information can still be modified. |
Current value
The most recent recorded measurement value of the performance point that caused the notification is shown here, if it is less than 24 hours old
Condition/Limit
This section shows which limit value has caused the notification, if it has been caused by a limit value.
Time of notification
The event that caused the notification has started at this time.
Notification value
The measurement value of the channel at the moment when the notification has occurred.
Duration
The duration of the situation that caused the notification, in days, hours and minutes. For example, in the case of an upper limit notification, the duration is the time that the measurement value of the channel was continuously above the notification limit value.
Graph
You can see the graph of the measurement values of the channel around the time of the notification and you can evaluate the causes and consequences of the notification based on it.
Reasons and description
To acknowledge a notification, you must give it a description. You can quickly select the most common reasons for the description by clicking on the list of reasons above the description field.
You can add and remove common reasons from the list by first clicking the Modify reasons link.
You can then add a new common reason by writing a description for it in the Add new reason field and clicking Save without acknowledging.
You can delete saved reasons from the list by clicking the trash can next to the reason you want to delete.
Click Stop editing to return to selecting reasons.
You can freely enter text in the Description field or you can add reasons from the list by clicking the reason. You can also use both of these together.
Actions
In addition to the description and reasons, you can write the following actions from the notification in a separate field reserved for them. It is not necessary to write actions to acknowledge the notification.
You can edit the contents of the Actions field even after confirmation, unlike the contents of the Description field.
User notes
You can write free-form additional information related to the announcement in a separate User notes field. It is not necessary to provide user notes in order to acknowledge the notification.
You can edit the content of the User notes field even after confirmation, unlike the content of the Description field.
Saving and acknowledging the notification
You can save the information you have recorded using the Save button.
When the necessary information has been added to the notification, the Acknowledge button is activated and you can use the button to acknowledge the notification. Please note that if the situation is still active, the notification cannot be acknowledged even if all the information has been entered.
With the Back button, you return to the notification list without saving the notifications
Acknowledging multiple notifications at once
You can select several notifications from the notification list and acknowledge them at once. In this case, however, the same acknowledgment information is saved for all notifications, and you will not see the details of the notifications when you acknowledge them.
To acknowledge notifications, write a description or click on suitable reasons from the list to be added to the Description field.
Note that in order to edit reasons, you must acknowledge one notification at a time.
You can also write the actions in the field reserved for it.
You can edit the contents of the Action field even after confirmation, unlike the contents of the Description field.
Then click the Acknowledge button to acknowledge the notifications you previously selected at the same time and with the same description and action texts.
Viewing the acknowledged notification
Click on an acknowledged notification in the notification list to view its details. The notification box shows the same information as when acknowledging the notification.
You can still edit the contents of the Actions and User note fields of the acknowledged notification, but no longer the contents of the Description field. Finally, click Save to save your edits and return to the notification list.
