
On the Users page, you can see all the users connected to the client account. You can also add, edit and delete users.
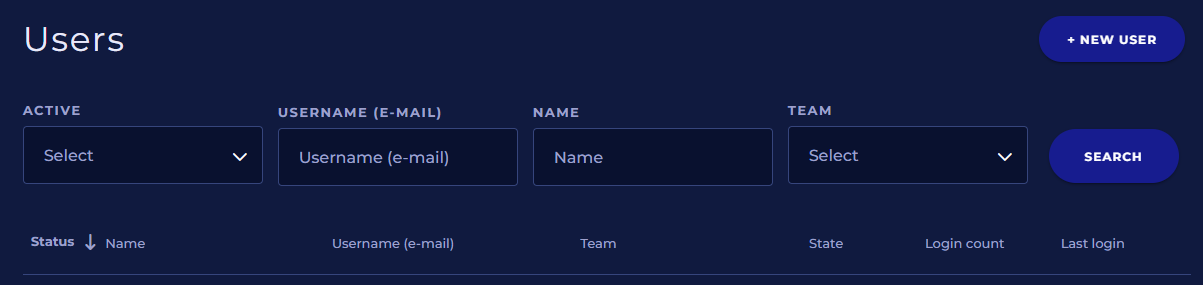
You can sort the list by different columns by clicking on the column headers. An arrow appears next to the column heading, indicating which column the list is organized by and in which direction.
You can also filter the user list by choosing the filter and then clicking Search button.
Creating new user
Click the New User button to create a new user.
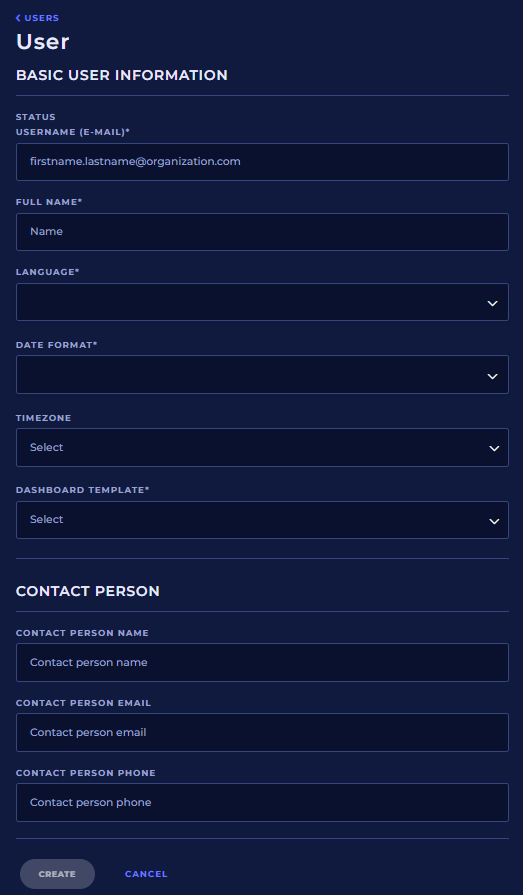
Basic user information
Username (e-mail)
The username must be a valid email address. The username activation message and password will be sent to this user's email address. The maximum length is 254 characters.
Full name
Enter the user's full name here. The maximum length is 50 characters.
Language
The language in which the user uses the service. The user can change the language later.
Date format
The format in which the service displays dates to the user. The user can change the date format later.
Timezone
The time zone where NSnappy displays all timestamps to the user. The user can change the time zone later.
Dashboard template
Choose from the list which of the dashboard templates the user will be have. The user can edit dashboard later.
Contact person
Contact person name
Enter the contact person's full name here. This can be the name of the user's supervisor or another person whom the user can contact when he needs help using the service. The maximum length is 50 characters.
Contact person email
Email address of the contact person. The maximum length is 254 characters.
Contact person phone
Contact person's phone number. Maximum length 50 characters.
Saving
After entering all the necessary information, finally click the Create button.
Once the user is created, you go directly to the user's edit view, where you can add usage rights for the user.
Editing and deleting a user
From the user's editing view, you can edit the user's basic information in the same way as when you created the user.
You can also see which teams the user belongs to in the Team section, but adding and removing teams must be done through the team management. Click on the team name to edit the team.
In addition, you can add and remove user specific usage rights to different objects. However, the recommended way is to grant usage rights using teams: Teams.
User usage rights
The user's usage rights are presented using two lists:
-
Inherited from teams
-
User specific rights
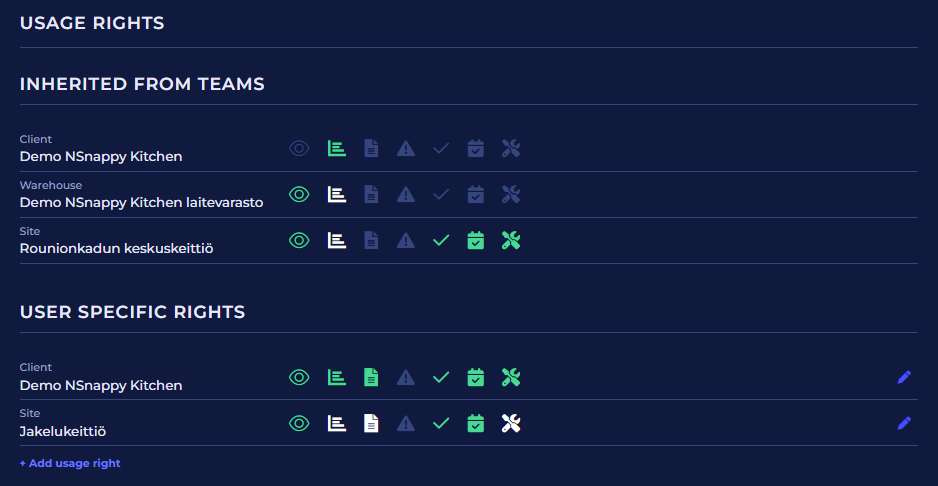
Both points have a similar list of items to which the user has access, either through the team or directly through the usage rights granted to the user.
The usage rights are listed by object in the list, and each line first shows the object's type in smaller font, and below it in larger font, the object's name. The team's usage rights to the object are represented by different colored icons. By moving the mouse over the icon, you can see the name of the usage right.
Usage rights icon colors
|
Icon color |
Meaning |
|---|---|
|
Dark blue |
This usage right does not exist for this item. |
|
Green |
The usage right in question has been given to the object in this usage right line. |
|
White |
The usage right in question is inherited from another usage right to the object. |
Adding usage rights
Adding usage rights to a user is done in the same way as for teams. See detailed instructions here: Teams → Adding usage rights.
Editing and deleting usage rights
Editing and deleting usage rights to a user is done in the same way as for teams. See detailed instructions here: Teams → Editing and deleting usage rights.
User info
In the last section of the user editing screen, you can see detailed information about the user account.
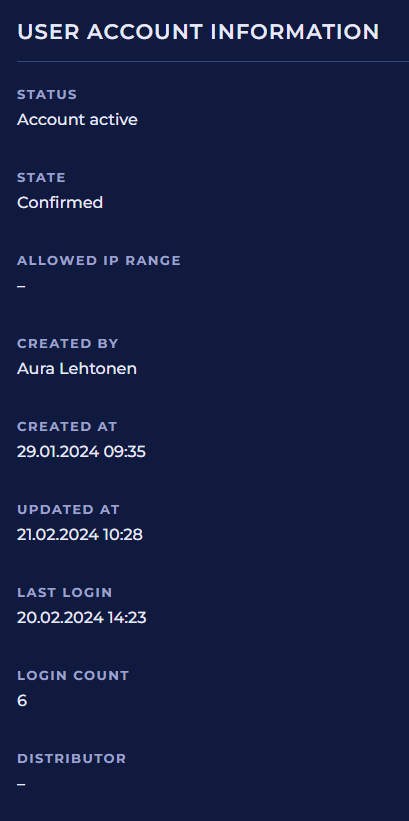
Status
Tells whether the user account is active or inactive
State
Tells whether the user has confirmed his user account or not.
Allowed IP range
Here you can see from which IP address range the user can log in if logging in is restricted.
Created by
The name of the user who created the user account.
Created at
User account creation time.
Updated at
User account update time.
Last login
The time when the user account was last logged in successfully.
Login count
How many times the user account has been logged in successfully.
Distributor
The name of the distributor, if the user account belongs to a distributor.
Saving, canceling and deleting
Click the Save button to save your changes.
Click the Cancel button if you want to discard the changes you made.
Click the red Delete button to delete the user. Note that deleting a user cannot be undone. The program asks for confirmation before deleting the user.
Usage rights
|
Data viewing |
Viewing permission to client |
|---|---|
|
Data viewing and editing |
Admin permission to client |
|
Creating and deleting users |
Admin permission to client |